How to Make Paper
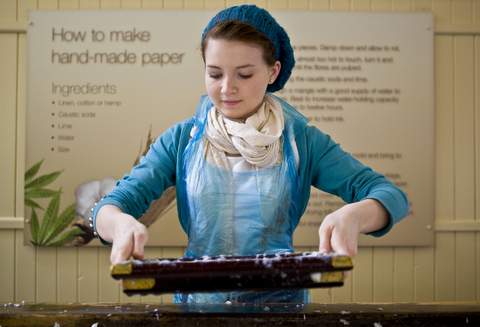
Making Handmade Paper in 10 Easy Steps
Ancient Egyptians invented the first substance like the paper we know today called Papyrus.
Papyrus scrolls were made by taking slices of the inner part of the papyrus stem, flattening then pounded into a hard, thin sheet. The word “paper” comes from the word “papyrus”. The Paper that we know today was invented by Ts’ai Lun in A.D. 105, It is believed that he mixed hemp, mulberry bark, and rags with water, mashed it into a pulp, pressed out the liquid and hung it to dry in the sun.
Paper was born and this humble mixture would set off one of mankind’s greatest communication revolutions.
Today there is a revival in homemade paper making crafts. Not only is it a fun experience for you and the kids, but it’s a good way to recycle waste into wonderful possibilities.
Below you will find a simple paper making recipe to get you started. If this is the first time you are making paper, don’t be afraid to experiment with different fibers, you don’t have to stick with paper related products. Add whole flower heads to the pulp mixture after it has been through the blender. You can add scraps of yarn, tin foil, even seeds. Its all comes down to what you want.
Experiment with different textures and colors after all Ts’ai Lun did! Remember, some of your ideas will turn out while others may not. Have fun with it, express your creativity.
Simple Recipe:
Many types of paper that can be used include:
- Computer Paper (unprinted)
- Newspaper (If you want a grayish colored paper)
- Magazines
- Egg Cartons
- Old Cards (For heavier paper)
- Toilet Paper
- Paper Bags
- Non Waxed Boxes (Pre-soak in warm water)
- Office Paper
- Tissue Paper (For finer paper)
- Typing Paper
- Napkins
- Construction Paper
Supplies you’ll need:
- Sponge
- Window Screening (mold)
- Wood Frame (old picture frame can be used too) (deckle)
- Plastic Basin/Tub (Large enough to totally immerse frame)
- Blender/Food Processor (For making paper pulp)
- White Felt or Flannel Fabric
- Staples or Tacks (For tacking screen on frame)
- Liquid starch (optional)
Instructions:
1. Select the pieces of paper to be recycled. You can even mix different types to create your own unique paper.
2. Rip the paper into small bits, and place into the blender. (about half full). Fill the blender with warm water. Run the blender slowly at first then increase the speed until the pulp looks smooth and well blended. ( 30 -40 seconds) Check that no flakes of paper remain. If there are, blend longer.
3. The next step is to make a mold. The mold, in this case, is made simply by stretching fiberglass screen (plain old door and window screen) over a wooden frame and stapling it. It should be as tight as possible.
4. Fill the basin about half way with water. Add 3 blender loads of pulp. (the more pulp you add the thicker the finished paper will be) Stir the mixture.
5. Now is the time to add the liquid starch for sizing.(This is not necessary but if the paper is going to be used for writing on, you should add some, the starch helps to prevent inks from soaking into the paper fibers.) Stir 2 teaspoons of liquid starch into the pulp.
Place the mold into the pulp and then level it out while it is submerged. Gently wiggle it side-to-side until the pulp on top of the screen looks even.
6. Slowly lift the mold up until it is above the level of the water. Wait until most of the water has drained from the new paper sheet. If the paper is very thick, remove some pulp from the tub. If it is too thin, add more pulp and stir the mixture again.
7. When the mold stops dripping, gently place one edge on the side of a fabric square (felt or flannel square). Gently ease the mold down flat, with the paper directly on the fabric. Use a sponge to press out as much water as possible. Wring the excess water from the sponge back into the large plastic tub.
8. Now comes the tricky part. Hold the fabric square flat and slowly lift the edge of the mold. The wet sheet of paper should remain on the fabric. If it sticks to the mold, you may have pulled to fast or not pressed out enough water. It takes a little practice. You can gently press out any bubbles and loose edges at this point.
9. Repeat the steps above, and stack the fabric squares on a cookie sheet. Save one fabric square to place on the top of the stack to cover the last piece of paper. Use another cookie sheet to press the remaining water out of the stack. (do this outside or in the bathtub, it can make a mess)
10. After you press the stack, gently separate the sheets. They can be dried by hanging on a clothesline or laying them out on sheets of newspaper. When they have dried peel them off the fabric and voila! you have paper!
The Author:
Pioneerthinking.com – Ingredient for a Simple Life
©2009 Pioneerthinking.com – All rights reserved. For personal use only.


hi There!
i need help, what do i need do and get, if i want to start a paper recycling factory.
yours
junias
I am a handmade paper maker and made lot of paper using mulberry bark,Daphne.
I learned this skills from a japanese expert on handmade paper making.
let me know if you need any help.
mr.T
I would love to hear about the skills that your learned from the Japanese Paper-making expert Mr. T.
I’ve been doing some research on paper making and am figuring out the logistics of how to set up the laboratory/work station for this process. Do you only use Mulberry or have your experimented with other fibers? I have not yet found an expert where I live to be able to direct these questions to, and I would appreciate your input! I would love to discuss this with you sometime!
Dear Sir,
How do we make a cylindrical shape core from paper pulp?
Thanks,
Edgar
Dear Sirs
about how to produce hand made sheet boards for making hard covers for books out from the waste of paper
Best regards
Dr S Ayoub
Jordan
You would need a decent press i imagine for making hard stock cardboard.
luckily, one can be built virtually anywhere in the world for little cost.
A simple press for paper making can be made with two heavy wooden boards drilled with 4 holes in the corners, and 4 threaded steel rods with wingnuts and washes (8 nuts, 4 wingnut and 4 normal, and 8 nice washers that all fit on your threaded rod.
drill the holes in the corners, or for more strength use two square stock steel bars instead for pressing, and heavier wood anbd.or steel plate.
a press for drying in almost mandatory for nice paper stock, and needed for cardstock and heavier. just stack your sheets in the press between a stack of blotter paper and other thicker paper stocks to suck out the moisture, experiment with thickness of the blotter and how many sheets you do at a time.
-alex
Hello sir i don’t have a wooden sieve what should i do
If you don’t have a wooden sieve, you can use other materials such as a fine mesh screen, cheesecloth, or even a piece of fabric with small holes. Choose a material that will allow water to pass through but will still be able to hold the pulp together. You can also try making your own sieve by stapling a piece of window screen to a wooden frame or use a plastic embroidery hoop.
Can i make it in different shape ?
The shape is totally up to you and your crafting. You do not have to use a deckle. If you “free form” the paper on the screen, using a rubber spatula or a couple popsicle/craft sticks, you can shape the pulp any way you like.
Hmm hard to understand.. wish there was a video we could watch.
thanks
Lee
How do I whiten the final product-it has been coming out with a light grey tint and would like to make whiter-thanks-Mark
Just a drop of bleach. It will keep flies from laying eggs which is also important.. IMPORTANT i stress is experimenting. At camp mine would come out grey or paper bag brown depending on the light. You should not expose the paper to light while it is drying it should remain warm also.. No one gets this one right the first time without help or making mistakes.
A video would be nice…
Can I use cornstarch instead of starch?
Sorry, but corn starch won’t work. You can make the paper without adding starch, then use a spray starch afterward and iron the paper. The starch makes the paper stiff and “sizes” it so you could write on it without it bleeding and blurring. They make liquid starch for laundry – it works fine. Again, if you want to wait till after you’ve created the paper and dried it a bit, you can use spray starch, then let it dry or iron the paper a bit.
Your instructions would be much easier to follow with some pictures for each step. For those of us who have never made paper before, it’s hard to imagine exactly what each step should look like without some form of visual aid.
you can look up several different videos on YouTube. Some of the best are from kids and art teachers.
Could anyone tell me what amount of pulp produces what amount of paper?
no
can you make paper in different shapes?
What if we don’t have a food processor??? I don’t wanna have to go out & buy one just for this art project
Get one cheap from a thrift store. There are always blenders and such at thrift stores.
I’ve seen people shred their pulp with an electric drill and an old table saw blade they welded to a long rod, then just ran that in a five gallon bucket like a paint stirrer, but a blender seems like the simplest solution. you might be able to do more with the drill/saw though, dangerous as it may be.
I don’t have frame. How can I made sheet
you cant
Thank you for this. I think some people are pretty rude and do not appreciate the time you did put into this. If people need videos, there is a website for that called YouTube. It is unfortunate that some people can’t say anything nice and have to post something negative instead of helpful.
Thanks for sharing your knowledge with us. I am excited to make this. Love making a mess!
can i use coconut fibers instead of recycled papers?
Thank you so much for taking the time to put this tutorial together.
I’m looking forward to experimenting with these techniques.
No thx
I did a handmade paper in the house. I must say that even comes out very cool these methods. It’s easy just need to do them well. Thanks for the nice post.
I am currently attempting to make paper. I think it is going well; no big pieces of anything is in the mixture. I will do more for refining the pulp soon. I’ve so far used a full book of Ayn Rand’s Atlas Shrugged, palm fronds, rose buds and their leaves, random white tree flowers, a seed spray from a tree in a Japanese garden, grape leaves, finely ground up sanddollars, sea salt, lavender soap, some sand, and other things I might be forgetting.
I ripped up the book first, yesterday from this post, each page from the glue binding of the paperback book. I think I then took the process into my bathroom: trying to use the sink first because it’s easier to manage, I tried covering it with clear plastic wrap and filling it with some hot water and the paper and some 30 tissues. I decided to say fuck it, and took the shit into the bathtub to vigorously rip it apart with my hands. Took a good while, perhaps a few hours. I decided not for a blender, fuck spending money and using the good one I have.
And just this night, I’ve finished gathering the gray algae looking substance into a restrainer bowl. I then took a walk, gathered some plant matter, ground the harder stuff up in a mortar and pestle, and ripped the plant fibers into bits and ran some warm water and mushed it up a bit.
Then I combined the plant fiber soup into the plastic IKEA trash can I’ve used before, but instead a bible, it’s Ayn Rand and various plant based fibers. It’s currently sitting in that, and that is sitting in the bathtub until I’ve thought out what method of getting a screen and frame.
I plan on either gathering some kind of wooden sticks and nailing and using wood glue to bind together, or using my left over oven bake clay( but that probably won’t be strong enough with my sort of handling pressure ), and binding a screen in between the frame; and if I can, one broad woven screen, and another fine screen.
Then I will probably use some super absorbing fabric, mostly towels, to suck the extra liquid from the mixture. I will probably end up using a hairdryer, the sun, rice or sand. (After the basin of water, I’ll replace the water with rice/sand to draw out moisture besides also using the sun + Hair dryer) I live in a very humid climate.
I am going to use the paper to write spells on, and then to sell.
So thanks even further for this tutorial, as its reminded me on how to make paper again, and especially since I can use it to sell my hobby.
I will post photos soon.
This is some really good information about the paper mill. It is good to know that it would be smart to have a window screen for when you are molding the paper. I wonder what gain paper factories use for the molding phase. It seems like you would need something bigger than window screens.